Chirpy Blog Customization
基于 Jekyll-Theme-Chirpy v7.3.0 的个性化设置:MathJax 配置、侧边栏样式、页脚站点统计、背景动画、自定义新的 prompt 和 details 元素样式、LQIP 和反色图片的 Python 实现等内容。
1. 简介
去年我通过 jekyll 在 GitHub 部署了静态博客网站,效果甚合我意。
但原先我使用的模板是 Huxpro,最近花了一点时间把模板改成了 Chirpy。以前 Jekyll 把主题样式和博客内容混杂在一起,不利于编辑,但在 3.2.0 版本后,Jekyll 引入了 gem-based theme,把网站的样式封装成了一个 gem 包,实现了主题样式和博客内容的分离(这有点类似于 HTML 和 CSS)。Chirpy 模板正是一个 gem-based theme,所以利用 Chirpy Starter 生成的 blog,它只包含了内容文件,要想实现对 Chirpy 模板的个性化处理,就必须找到它的样式文件。
有两种方法可供选择。第一种就是直接访问 Chirpy 的 GitHub 项目页面,从它的源码里扒出来样式文件及代码。第二种则利用 git,通过命令 bundle info --path jekyll-theme-chirpy 获取封装的样式文件地址,如下图所示
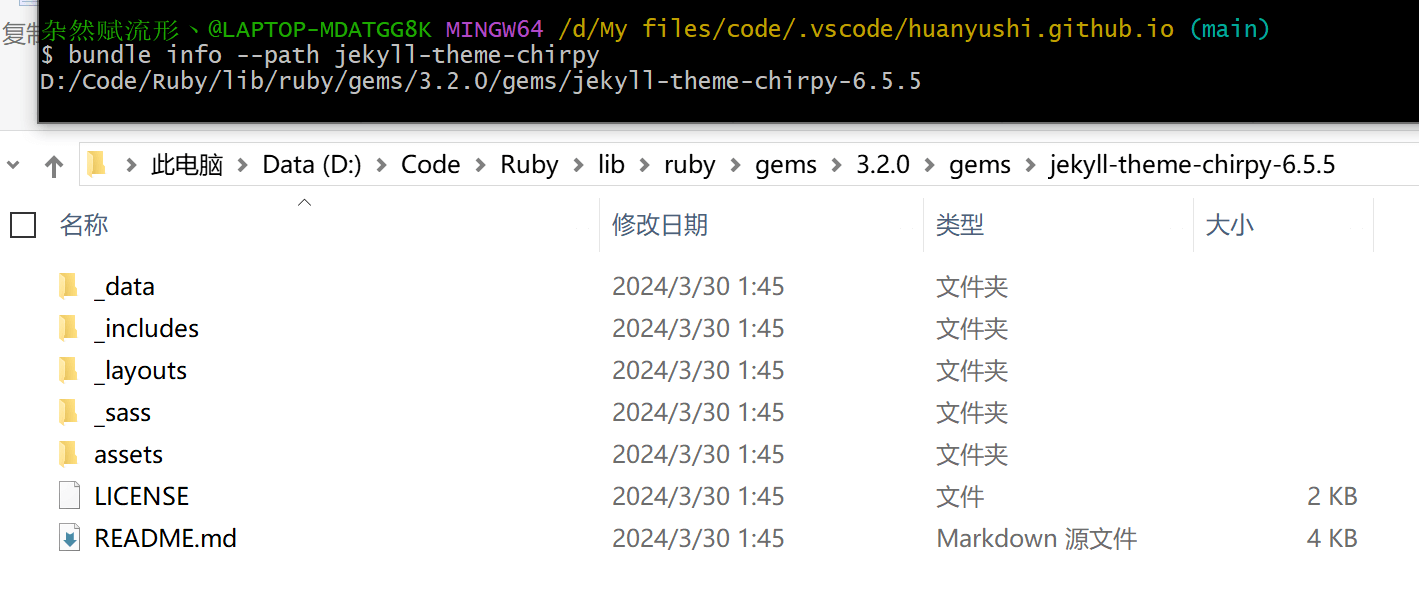 封装的样式文件地址
在里面找到相应的样式文件后,把它放入自己 blog 对应的文件里,就可以进行个性化定制了。
该图片停留在 6.5.5 版本,但新版本也是类似的,便不再更新了。
注意生成博客时,放入自己 .github.io 文件夹的样式文件会覆盖原先 gem 包里的同名文件,而未修改的样式文件则照样从 gem 包里读取,所以未修改的样式文件没必要导入,这样也方便后续跟随模板进行更新。
本篇文章就是记录一些我个人对 Chirpy 进行的部分修改(一些小的修改就不写了)。
2. 修改 MathJax 配置
MathJax 自从进入 3.x 时代后,渲染数学公式的速度几乎比肩 KaTeX,再考虑到 MathJax 支持丰富的拓展包,功能相比 KaTeX 更为强大,所以我更倾向于使用 MathJax(没有 Physics 包可以要了我半条命)。模板作者对 MathJax 的设置在 assets/js/data/mathjax.js 文件中,在隐藏的 gem 包里找到相应代码,即可进行修改。
2.1. MathJax 添加拓展包
我添加了一些拓展包,如物理专业学生人手必备的 physics,同时也自定义了一些宏来简化公式输入。代码修改如下(更多内容可以从 MathJax 官网文档里找到说明):
1
2
3
4
5
6
7
8
9
10
11
12
13
14
15
16
17
18
19
20
21
22
23
24
25
26
27
28
29
30
31
32
---
layout: compress
# WARNING: Don't use '//' to comment out code, use '{% comment %}' and '{% endcomment %}' instead.
---

{%- comment -%}
  See: <https://docs.mathjax.org/en/latest/options/input/tex.html#tex-options>
{%- endcomment -%}

MathJax = {
  loader: { load: ['[tex]/physics',] },
  tex: {
    inlineMath: [
      ['$', '$'],
      ['\\(', '\\)']
    ],
    displayMath: [
      ['$$', '$$'],
      ['\\[', '\\]']
    ],
    packages: {'[+]': ['physics']},
    tags: 'ams',
    macros: {
        'e': '\\mathrm{e}',
        'i': '\\mathrm{i}',
        'RR': '\\mathbb{R}',
        'ZZ': '\\mathbb{Z}',
        'QQ': '\\mathbb{Q}',
      },
  },
  svg: { fontCache: 'global'},
};
2.2. 增加主页 preview 公式预览
在 blog 主页,每篇文章的预览部分会直接显示数学代码,要想能够在主页也预览公式,可以参考 issue-1140。
暂时没有这个打算,这个功能似乎相对鸡肋。以后有需要再开吧。
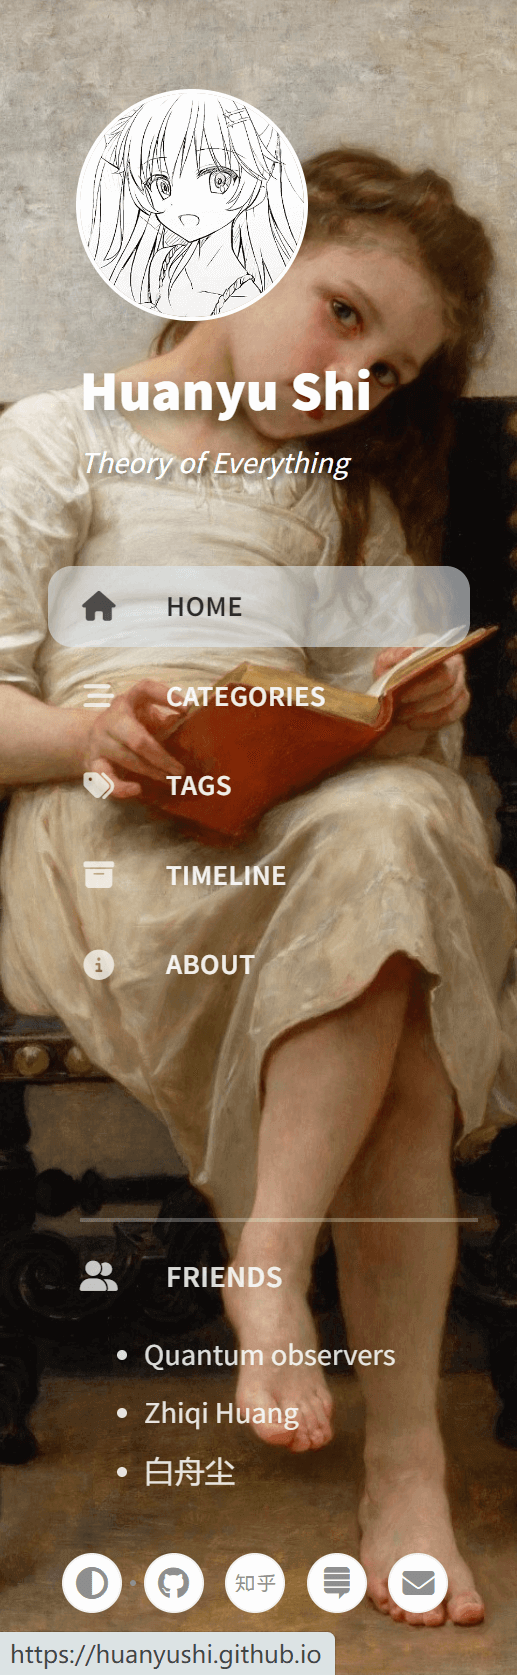
3. 修改侧边栏样式
3.1. 侧边栏增加背景图片
在 assets/css/jekyll-theme-chirpy.scss 文件中,增加对侧边栏样式设置的 CSS 代码,其中 background-image 便是用来添加背景图片的基本命令,只需后面添加图片的 url 即可,如下:
1
2
3
4
5
6
7
/* 侧边栏背景图片添加 */
#sidebar {
    background-image: url(https://cdn.jsdelivr.net/gh/huanyushi/huanyushi.github.io@mainhttps://cdn.jsdelivr.net/gh/huanyushi/blog-images@main/img/background.jpg); /* <- change background image */
    background-size: cover; /* <- customize the image size */
    background-repeat: no-repeat; /* <- no-repeat */
    background-position: top; /* <- image position */
}
同样也要注意修改相应文字的颜色,我这里选的是深色背景,所以对应文字都是白色,
1
2
3
4
5
6
7
8
9
10
11
12
13
14
15
/* 侧边栏相关文字样式设置 */
#sidebar .site-title {
    color: #ffffff;
    text-shadow: 5px 5px 10px rgba(0,0,0,0.5);
}
#sidebar .site-subtitle {
    color: #ffffff;
    text-shadow: 2px 2px 3px rgba(0,0,0, 0.7);
}
#sidebar ul li.nav-item a.nav-link span{
    font-size: 100%;
}
#sidebar ul li.nav-item a.nav-link {
    color: #ffffff;
}
3.2. 侧边栏增加友链
在隐藏的 gem 包里找到 _includes/sidebar.html 文件,在其中添加以下代码(当有友链时,则插入 friends.html 文件):
1
2
3
4
<!-- Friends link -->
{% if site.data.friends %}
    {% include friends.html %}
{% endif %}
新建一个 _includes/friends.html 文件,将友链设置放入其中(这样模板更新时可以尽可能减少对模板代码的修改):
1
2
3
4
5
6
7
8
9
10
<!-- 友链设置,在 sidebar.html 中插入 -->
<div class="friends">
    <hr style="color:white;border: 1px solid ">
    <p><i class="fas fa-user-friends"></i><span>FRIENDS</span></p>
    <ul>
      {% for friend in site.data.friends %}
      <li><a href="{{friend.href}}">{{friend.title}}</a></li>
      {% endfor %}
    </ul>
</div>
而相关的样式设置添加到了 assets/css/jekyll-theme-chirpy.scss 中,如下:
1
2
3
4
5
6
7
8
9
10
11
12
13
14
15
16
17
18
19
20
21
22
23
24
25
26
27
28
29
30
31
/* 侧边栏友链样式设置 */
#sidebar .friends {
    padding-left: 2.5rem;
    padding-right: 1.25rem;
    width: 100%;
    margin-bottom: 1.5rem;
}
#sidebar .friends p {
    color: rgb(255,255,255,0.95);
    font-family: inherit;
    font-weight:600;
    font-size: 95%;
}
#sidebar .friends p i {
    opacity: 0.8;
    margin-right: 1.5rem;
}
#sidebar .friends p span {
    letter-spacing: 0.2px;
    opacity: 0.9;
}
#sidebar .friends ul {
    color:white;
    font-size:95%;
    opacity: 0.95;
    margin-bottom: 0rem;
}
#sidebar .friends ul li {
    margin-bottom: 0.4rem;
    opacity: 0.9;
}
已成功封装,只需要在 _data/friends.yml 里添加以下设置即可(可以一直往后叠加):
1
2
3
4
5
6
- title: "Title1"
  href: "https://example.com"
- title: "Title2"
  href: "https://example.com"
- title: "Title3"
  href: "https://example.com"
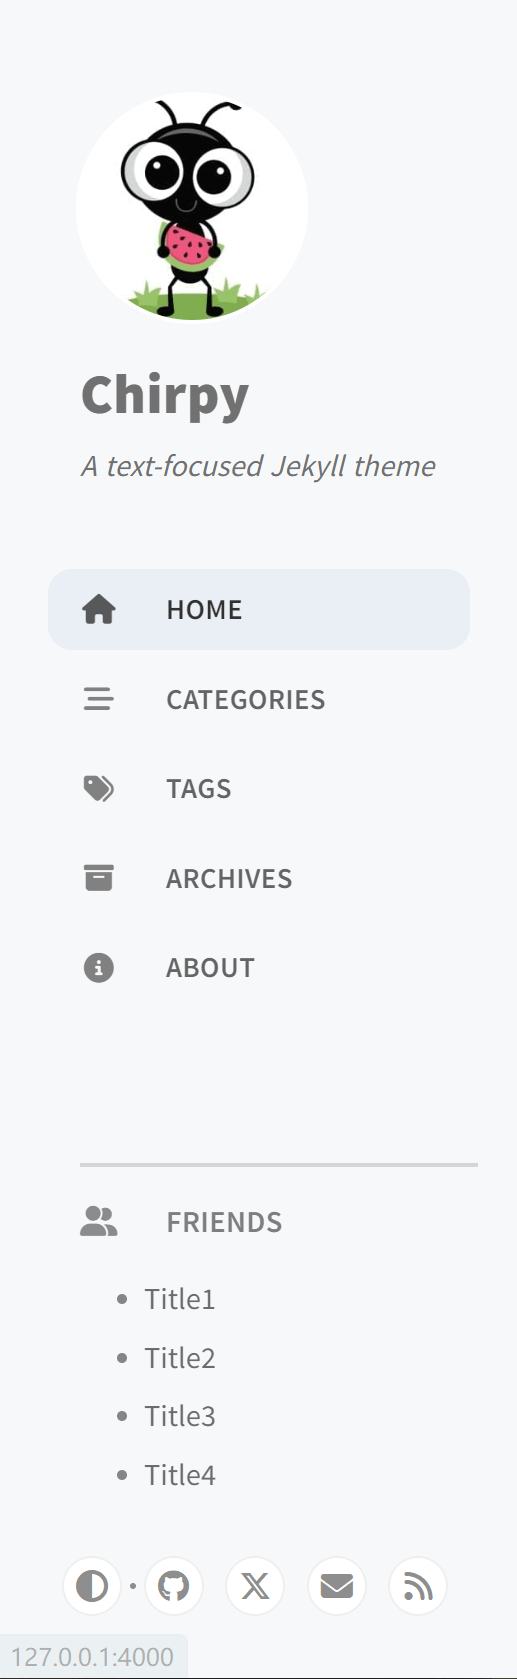 | 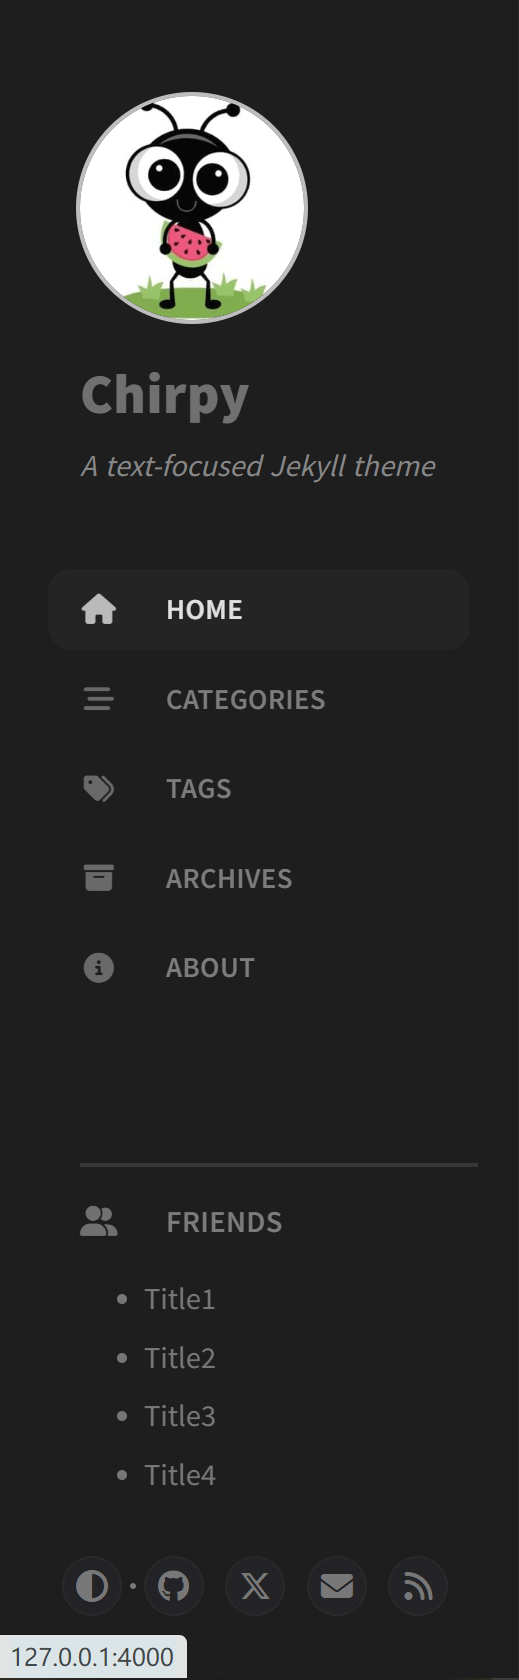 |  |
- 友链不能加太多,容易挤占底部社交平台的空间,让它跑到屏幕外面去了(不过这也和系统分辨率有关系)。如果友链太多建议在侧边栏新开一个选项卡,也就是新建一个
_tabs/friends.md。 - 我这里设置的是友链沉底,保持在底部社交平台上方。如果分辨率拉大,会发现它和上面侧边栏选项卡之间有很大间距。如果想调整友链位置紧跟选项卡之后,可以在
_includes/sidebar.html中修改选项卡的样式,将<nav class="flex-column flex-grow-1 w-100 ps-0">中的flex-grow-1删除;并加入到友链样式中,原先的<div class="friends">修改为<div class="friends flex-grow-1">。同时assets/css/jekyll-theme-chirpy.scss中#sidebar .friends里的margin-bottom: 2rem修改为上间距margin-top: ? rem, ? 的值可以自己选定。
4. 增加评论区
评论区使用 giscus,模板作者已经将相关选项封装好了,在 _config.yml 文件中填上个人信息即可。
教程请见 giscus 项目,关于它的高级功能设置请见 Advanced usage。
5. 增加站点统计
模板作者贴心的在页脚使用了 flex 格式,直接找到 _includes/footer.html 文件(这个文件在 gem 包里),复制后在中间插入不蒜子即可成功在页脚显示站点统计,uv 和 pv 就是访问量的两种统计算法,具体解释请见教程。
1
2
3
4
<!-- 站点统计 -->
<p>
  {% include footer-busuanzi.html %}
</p>
不蒜子的代码设置在 _includes/footer-busuanzi.html 中:
1
2
3
4
<!-- 不蒜子站点统计,放在页脚处 (footer.html 中插入) -->
<script async src="https://busuanzi.ibruce.info/busuanzi/2.3/busuanzi.pure.mini.js"></script>
<i class="fa fa-user" aria-hidden="true"></i> <span id="busuanzi_value_site_uv"></span> |
<i class="fa fa-eye" aria-hidden="true"></i> <span id="busuanzi_value_site_pv"></span>
另外更多详细的站点统计信息(如用户量、用户地区、用户访问了哪些页面等内容)可以使用 Google Analytics 来获取,在 _config.yml 中加入 ID 即可。
6. 增加背景动画
参考 @NichtsHsu 的博客设计,增加了背景动画功能。在 _layouts/default.html (这个文件也在 gem 包里)中加入
1
2
3
{% if site.backgroud_animation %}
  {% include animated-background.html %}
{% endif %}
新建一个文件 _includes/animated-background.html 用于设置动画,其实就是添加了一堆 animation-circle 对象,影响的是生成动画的元素个数。
1
2
3
4
5
<div id="animation">
  {% for i in (1..50) %}
    <div class="animation-circle"></div>
  {% endfor %}
</div>
而样式设计在 assets/css/jekyll-theme-chirpy.scss 中,
1
2
3
4
5
6
7
8
9
10
11
12
13
14
15
16
17
18
19
20
21
22
23
24
25
26
27
28
29
30
31
32
33
34
35
36
37
38
39
40
41
42
43
44
45
46
47
48
49
50
51
52
53
54
55
56
57
58
59
60
61
62
63
64
65
66
67
68
69
70
71
72
73
74
75
76
77
78
/* 生成动画 */
@use 'sass:math';
@keyframes infirot {
    from {
      -webkit-transform: rotate(0deg);
    }

    to {
      -webkit-transform: rotate(360deg);
    }
  }

  .icon-loading1 {
    display: inline-block;
    animation: infirot 1s linear infinite;
    -webkit-animation: infirot 1s linear infinite;
  }

  @function random_range($min, $max) {
    $rand: math.random();
    $random_range: $min + math.floor($rand * (($max - $min) + 1));
    @return $random_range;
  }

  #animation {
    position: fixed;
    top: 0;
    left: 0;
    width: 100%;
    height: 100%;
    overflow: hidden;
    pointer-events: none;

    @keyframes animate {
      0% {
        transform: translateY(0) rotate(0deg);
        opacity: 1;
        border-radius: 0;
      }
      100% {
        transform: translateY(-1200px) rotate(720deg);
        opacity: 0;
        border-radius: 50%;
      }
    }

    @media all and (min-width: 1200px) {
      .animation-circle {
        position: absolute;
        left: var(--circle-left);
        bottom: -300px;
        display: block;
        background: var(--circle-background);
        width: var(--circle-side-length);
        height: var(--circle-side-length);
        animation: animate 25s linear infinite;
        animation-duration: var(--circle-time);
        animation-delay: var(--circle-delay);
        pointer-events: none;

        @for $i from 0 through 50 {
          &:nth-child(#{$i}) {
            --circle-left: #{random_range(0%, 100%)};
            --circle-background: rgba(#{random_range(0, 255)}, #{random_range(0, 255)}, #{random_range(0, 255)}, 0.06); // 最后一个数为透明度
            --circle-side-length: #{random_range(20px, 200px)};
            --circle-time: #{random_range(10s, 45s)};
            --circle-delay: #{random_range(0s, 25s)};
          }
        }
      }
    }

    @media all and (max-width: 1199px) {
      .animation-circle {
        display: none;
      }
    }
  }
在 _config.yml 中设置 backgroud_animation: true 即可产生动画效果。
7. 增加 GitHub 贡献图
利用 GitHub 上的一个项目 gh-contrib-graph,在 HTML 里加入以下代码:
1
2
3
4
5
6
7
8
<!-- GOES INTO HEAD -->
<link rel="stylesheet" href="http://lengthylyova.pythonanywhere.com/static/gh-contrib-graph/gh.css">

<!-- GOES INTO BODY -->
<div id="gh" data-login="YOUR_GITHUB_LOGIN"></div>

<!-- GOES INTO THE END OF BODY -->
<script src="http://lengthylyova.pythonanywhere.com/static/gh-contrib-graph/gh.js"></script>
将其中的 YOUR_GITHUB_LOGIN 改成 GitHub 用户名即可。
我个人建议在 assets/css/jekyll-theme-chirpy.scss 导入外部 CSS 样式文件,即(下面是我自己设置的样式代码)
1
2
3
4
5
6
7
8
9
10
11
12
13
14
15
16
17
@use url('http://lengthylyova.pythonanywhere.com/static/gh-contrib-graph/gh.css');

.ghCalendarHeader {
  margin-bottom: 1rem;
  color:var(--text-color);
}
.ghThumbNail {
  display: none;
}
#gh a {
  text-decoration: none;
  color: var(--link-color);
}
.ghCalendarCard {
  border: var(--language-border-color) 1px solid;
  border-radius: .5rem;
}
然后在需要加入的地方插入剩下两行代码即可(.md支持 HTML 语言),效果如下图所示:
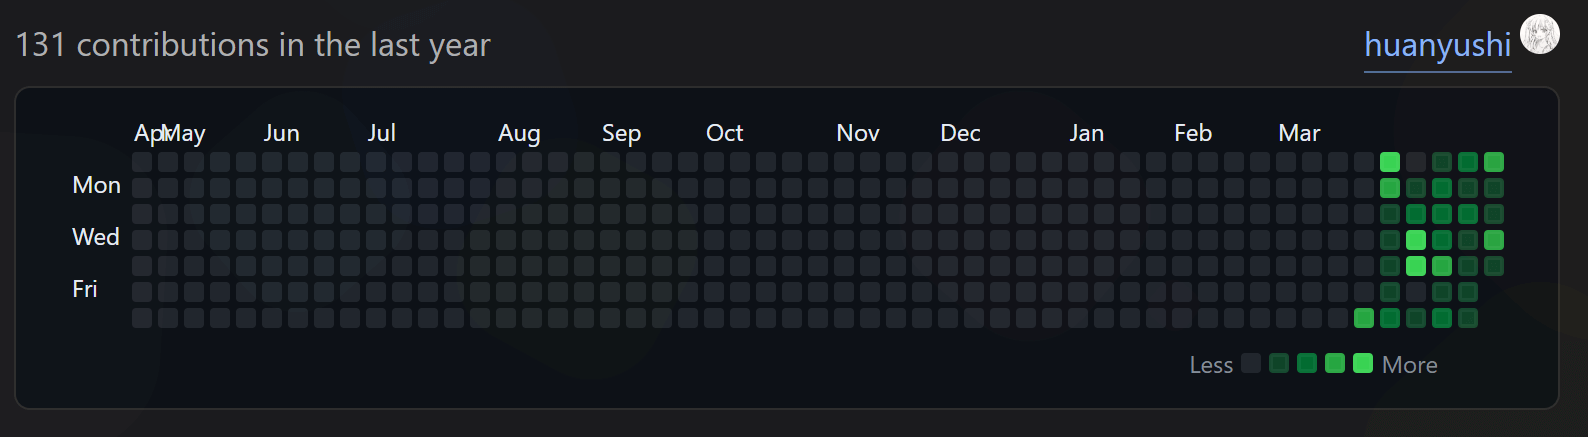 GitHub 贡献图
我嫌加载太慢就没加进去了,这玩意儿放在
about.md是个不错的选择。
8. 增加 4 个新的 prompt
模板作者已经设置了 4 个 prompt,效果如下:
To be or not to be. That is a question.
To be or not to be. That is a question.
To be or not to be. That is a question.
To be or not to be. That is a question.
在此基础上,我构建了 4 个新的 prompt,效果如下:
To be or not to be. That is a question.
To be or not to be. That is a question.
To be or not to be. That is a question.
\[x^2 + y^2 =z^2\]To be or not to be. That is a question.
— Shakespeare
当然也可以不加标题,效果如下:
To be or not to be. That is a question.
To be or not to be. That is a question.
To be or not to be. That is a question.
To be or not to be. That is a question.
想要实现此功能,只需要在 assets/css/jekyll-theme-chirpy.scss 中加入以下代码即可:
1
2
3
4
5
6
7
8
9
10
11
12
13
14
15
16
17
18
19
20
21
22
23
24
25
26
27
28
29
30
31
32
33
34
35
36
37
38
39
40
41
42
43
44
45
46
47
48
49
50
51
52
53
54
55
56
57
58
59
60
61
62
63
64
65
66
67
68
69
70
71
72
73
74
75
76
77
/* colorbox 样式设计 */
/* 定义了 box-info, box-tip, box-warning, box-danger 四种 colorbox */
@mixin colorbox($border-color, $icon-color, $icon-content, $bg-color, $fa-style: 'solid') {
    border-left: .2rem solid $border-color;
    border-radius: 0.25rem;
    color: var(--text-color);
    padding: .6rem 1rem .6rem 1.5rem;
    box-shadow: var(--language-border-color) 1px 1px 2px 1px;
    position: relative;
    margin-bottom: 1rem;

    > div.title::before {
      content: $icon-content;
      color: $icon-color;
      font: var(--fa-font-#{$fa-style});
      text-align: center;
      width: 3rem;
      position: absolute;
      left: .2rem;
      margin-top: .4rem;
      text-rendering: auto;
      -webkit-font-smoothing: antialiased;
    }

    > div.title {
      background-color: $bg-color;
      color: $icon-color;
      padding: .5rem .6rem .5rem 3rem;
      margin: -.6rem -1rem .6rem -1.5rem;
      font-weight: 600;
    }

    > p:last-child{
        margin-bottom: 0;
    }
}

/* box-info 蓝色 */
.box-info {
@include colorbox(
    var(--prompt-info-icon-color),
    var(--prompt-info-icon-color),
    "\f06a",
    var(--prompt-info-bg)
);
}

/* box-tip 绿色 */
.box-tip {
@include colorbox(
    var(--prompt-tip-icon-color),
    var(--prompt-tip-icon-color),
    "\f0eb",
    var(--prompt-tip-bg),
    'regular'
);
}

/* box-warning 黄色 */
.box-warning {
@include colorbox(
    var(--prompt-warning-icon-color),
    var(--prompt-warning-icon-color),
    "\f06a",
    var(--prompt-warning-bg)
);
}

/* box-danger 红色 */
.box-danger {
@include colorbox(
    var(--prompt-danger-icon-color),
    var(--prompt-danger-icon-color),
    "\f071",
    var(--prompt-danger-bg)
);
}
9. Details 元素的样式设计
HTML 中的 <details class="details-block"> 元素可以创建一个组件,仅当被切换为展开状态时,才会显示里面的内容,效果如下:
详细信息
床前明月光,疑是地上霜。举头望明月,低头思故乡。
\[x^2 + y^2 =z^2, \quad x_{1,2} = \frac{-b\pm\sqrt{b^2-4ac}}{2a}\]在 Markdown 文件输入以下代码即可实现,其中 markdown = "1" 是为了在 HTML 元素内也可以使用 Markdown 语法,另外在其中加入 open 可以设置它为默认展开的形式(否则为默认关闭):
1
2
3
4
5
6
7
8
9
<details class="details-block" markdown="1">
<summary>详细信息 </summary>
床前明月光,疑是地上霜。举头望明月,低头思故乡。

$$
x^2 + y^2 =z^2, \quad x_{1,2} = \frac{-b\pm\sqrt{b^2-4ac}}{2a}
$$

</details>
样式的设计添加到了 assets/css/jekyll-theme-chirpy.scss 中,加入以下代码即可(注意我在下面的基础上更改了颜色,并不完全一样):
1
2
3
4
5
6
7
8
9
10
11
12
13
14
15
16
17
18
19
20
21
22
23
24
25
26
27
28
29
30
31
32
33
34
35
36
37
38
39
40
41
42
43
44
45
46
47
48
49
50
51
52
53
54
55
56
57
58
59
60
61
62
63
64
65
66
67
68
69
// details class="details-block" 样式设计
details.details-block {
    border-radius: .25rem;
    border-left: .2rem solid var(--prompt-tip-icon-color);
    box-shadow: var(--language-border-color) 1px 1px 2px 1px; /* 借用了代码框的边框颜色变量 */
    margin-bottom: 1rem;
    padding: .6rem 1rem .6rem 1.5rem;
    > p:last-child{
        margin-bottom: 0;
    }
}

details.details-block > summary {
    padding: .5rem 1.0rem .5rem 1.0rem;
    margin: -.6rem -1rem -.6rem -1.5rem;
    font-weight: 600;
    background-color: var(--prompt-tip-bg);
    color: var(--prompt-tip-icon-color);
    text-decoration: underline;
    position: relative;
    list-style: none; /* 隐藏默认的箭头 */
}

details.details-block > summary::-webkit-details-marker {
    display: none; /* IOS 隐藏默认的箭头 */
}
details.details-block > summary::marker {
    content: none; /* 隐藏默认的箭头 */
}

details.details-block > summary::before {
    /* 关闭状态下 */
    /* 也可以用其他符号或自定义图标,比如 Unicode 字符 */
    // content: '🙈';
    /* content:'\002B9A'; */
    content: '😼';
    margin-right: .5rem;
    display: inline-block;
}
details.details-block[open] > summary::before {
    /* 展开状态下 */
    /* content: '🐵';*/
    /* content: '\002B9B'; */
    content: '🙀';
    animation: my-cat .2s ease-in-out; /*  点击会有动画效果 */
    margin-right: .5rem;
}

details.details-block > summary::after {
    font-family: 'Font Awesome 6 Free';
    content: "\f105"; /* Unicode for fa-angle-down */
    display: inline-block;
    transition: transform 0.2s ease; /* 添加旋转动画 */
    position: absolute;
    right: 1rem; /* 调整箭头在最右边的位置 */
}

details.details-block[open] > summary::after {
    transform: rotate(90deg);
}

details.details-block[open] > summary{
    // transition: margin 200ms ease-out; /* 展开会有动画效果 */
    margin-bottom: .6rem;
}

@keyframes my-cat {
    50%  { transform: scale(1.2); } /* 动画效果代码 */
}
10. LQIP 的 Python 实现
LQIP (Low Quality Image Placeholder) 指的是低质量图像占位符,这是一种网页性能优化技术,在加载高质量图像之前,先加载一个轻量级、低分辨率的模糊图像来提供一种预览。这种预览图像可以帮助减少页面加载时间和带宽消耗,提高访问者的视觉体验。
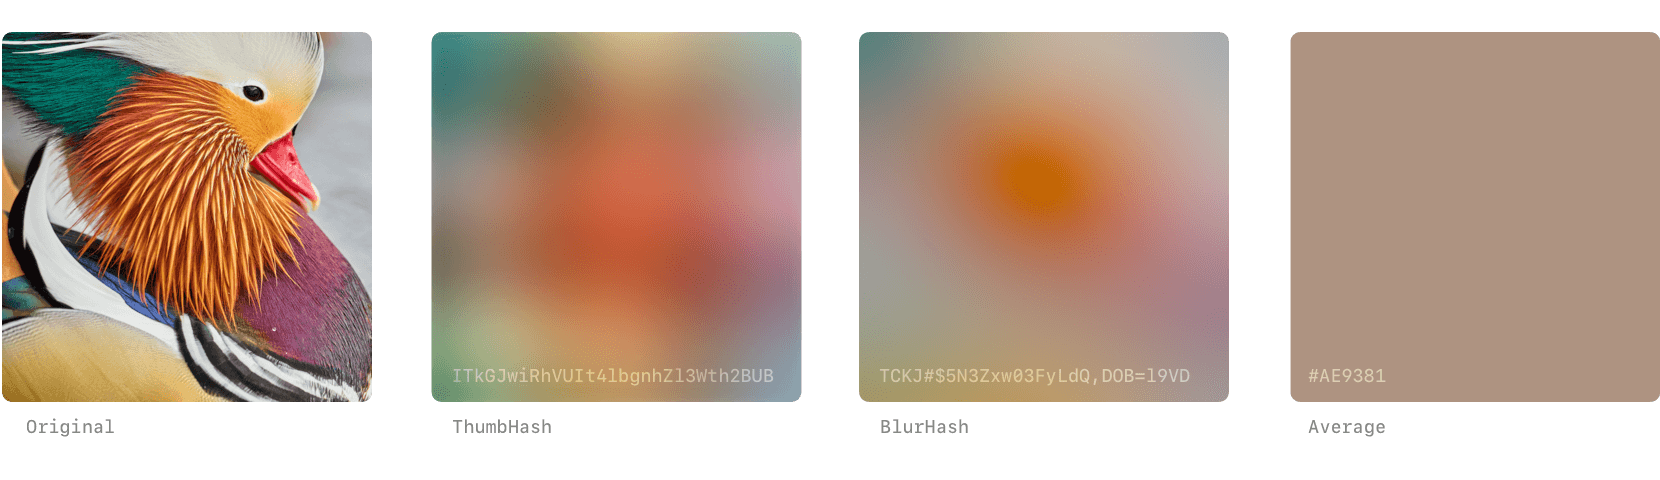 低质量图像占位符,from daun.
作者在模板里添加了此功能,在每个文档的前言区设置 lqip 即可。我写了一个 Python 代码可以方便地将图像压缩模糊并保存,且转换成 base64 编码。这是根据我的文件路径来写的,有需要可以自行调整。
1
2
3
4
5
6
7
8
9
10
11
12
13
14
15
16
17
18
19
20
21
22
23
24
25
26
27
28
29
30
31
32
33
34
35
36
37
38
39
40
from PIL import Image, ImageFilter
import base64
import pyperclip

def image_lqip(image_path,output_image_path,length=16,width=8,radius=2):
    """
    生成 LQIP(Low-Quality Image Placeholder)并保存到文件中,并返回base64编码的字符串。

    参数:
    - image_path:原始图像文件路径
    - output_image_path:输出 LQIP 文件路径
    - length:调整后图像的长度,默认为 16
    - width:调整后图像的宽度,默认为 8
    - radius:高斯模糊的半径,默认为 2

    返回值:
    - base64 编码的字符串
    """
    im = Image.open(image_path)
    im = im.resize((length,width))
    im = im.convert('RGB')
    im2 = im.filter(ImageFilter.GaussianBlur(radius)) # 采用高斯模糊
    im2.save(output_image_path)

    # 转成 base64 编码
    with open(output_image_path, "rb") as image_file:
        encoded_string = base64.b64encode(image_file.read())
        base64_string = encoded_string.decode('utf-8')

    return base64_string

image_start = "../huanyushi.github.io"
image_end = input()
image_path = image_start + image_end

base64_image = image_lqip(image_path, "test.jpg")

pyperclip.copy('data:image/jpg;base64,'+ base64_image) # 将 print 结果导入粘贴里
print(base64_image)
print(image_end) # 顺带输出一下导入的是什么文件
如果想要将 base64 编码的字符串转换成图片,也可以用以下 Python 程序进行转换。
1
2
3
4
5
6
7
8
9
10
11
12
13
14
15
16
17
18
19
20
21
import base64

def save_base64_image(base64_string, output_path):
    """
    将base64编码的字符串保存为图像文件。

    参数:
    - base64_string:base64编码的字符串
    - output_path:输出图像文件路径
    """

    # 解码base64编码的字符串
    decoded_data = base64.b64decode(base64_string)

    # 将解码后的数据保存为图像文件
    with open(output_path, 'wb') as image_file:
        image_file.write(decoded_data)

# 这是模板作者里用的图片,当作例子来展示了。
base64_string = "/9j/4AAQSkZJRgABAQAAAQABAAD/2wBDAAgGBgcGBQgHBwcJCQgKDBQNDAsLDBkSEw8UHRofHh0aHBwgJC4nICIsIxwcKDcpLDAxNDQ0Hyc5PTgyPC4zNDL/2wBDAQgJCQwLDBgNDRgyIRwhMjIyMjIyMjIyMjIyMjIyMjIyMjIyMjIyMjIyMjIyMjIyMjIyMjIyMjIyMjIyMjIyMjL/wAARCAAIABADASIAAhEBAxEB/8QAHwAAAQUBAQEBAQEAAAAAAAAAAAECAwQFBgcICQoL/8QAtRAAAgEDAwIEAwUFBAQAAAF9AQIDAAQRBRIhMUEGE1FhByJxFDKBkaEII0KxwRVS0fAkM2JyggkKFhcYGRolJicoKSo0NTY3ODk6Q0RFRkdISUpTVFVWV1hZWmNkZWZnaGlqc3R1dnd4eXqDhIWGh4iJipKTlJWWl5iZmqKjpKWmp6ipqrKztLW2t7i5usLDxMXGx8jJytLT1NXW19jZ2uHi4+Tl5ufo6erx8vP09fb3+Pn6/8QAHwEAAwEBAQEBAQEBAQAAAAAAAAECAwQFBgcICQoL/8QAtREAAgECBAQDBAcFBAQAAQJ3AAECAxEEBSExBhJBUQdhcRMiMoEIFEKRobHBCSMzUvAVYnLRChYkNOEl8RcYGRomJygpKjU2Nzg5OkNERUZHSElKU1RVVldYWVpjZGVmZ2hpanN0dXZ3eHl6goOEhYaHiImKkpOUlZaXmJmaoqOkpaanqKmqsrO0tba3uLm6wsPExcbHyMnK0tPU1dbX2Nna4uPk5ebn6Onq8vP09fb3+Pn6/9oADAMBAAIRAxEAPwB1s4jcEmpLtg7ZU0UV9jb3rnwt/csf/9k="
save_base64_image(base64_string, "decoded_image.webp")
11. 反色图片的 Python 实现
Blog 支持暗色模式,同时文中的图片也可以相应转换至暗色模式,对于部分图片可以直接通过反色的方式将亮色转换至暗色(但不是所有,注意反色不等于暗色!),我写了一个 Python 程序可以将图片转换至暗色模式,有需要可以自取。同样,文件路径也是根据我自己实际情况来设置的,需要做相应修改:
1
2
3
4
5
6
7
8
9
10
11
12
13
14
15
16
17
18
19
20
21
22
23
24
25
26
27
28
29
30
31
from PIL import Image, ImageChops
import matplotlib.pyplot as plt

def invert_color(fname):
    im = Image.open(fname)
    if im.mode == "P":
        im = im.convert('RGB')
    im_inverted = ImageChops.invert(im)
    # im.close()
    return im, im_inverted

# 这部分是调整至图片文件路径
path_start = "../img/in-post/"
path_end = '2023-03-23/preface.PNG'
image_path = path_start + path_end

image_origin, image_inverted = invert_color(image_path)

# 绘图对比,不想绘图可以直接去掉
plt.subplot(121)
plt.title('original')
plt.axis('off')
plt.imshow(origin, cmap='gray', vmin=0, vmax=255)
plt.subplot(122)
plt.title('inverse')
plt.imshow(image_output, cmap='gray', vmin=0, vmax=255)
plt.axis('off')
plt.show()

# 保存图片
image_output.save(image_start + image_end.replace('.', '-dark.')) # 如:test.PNG 生成的反色图片保存为 test-dark.PNG
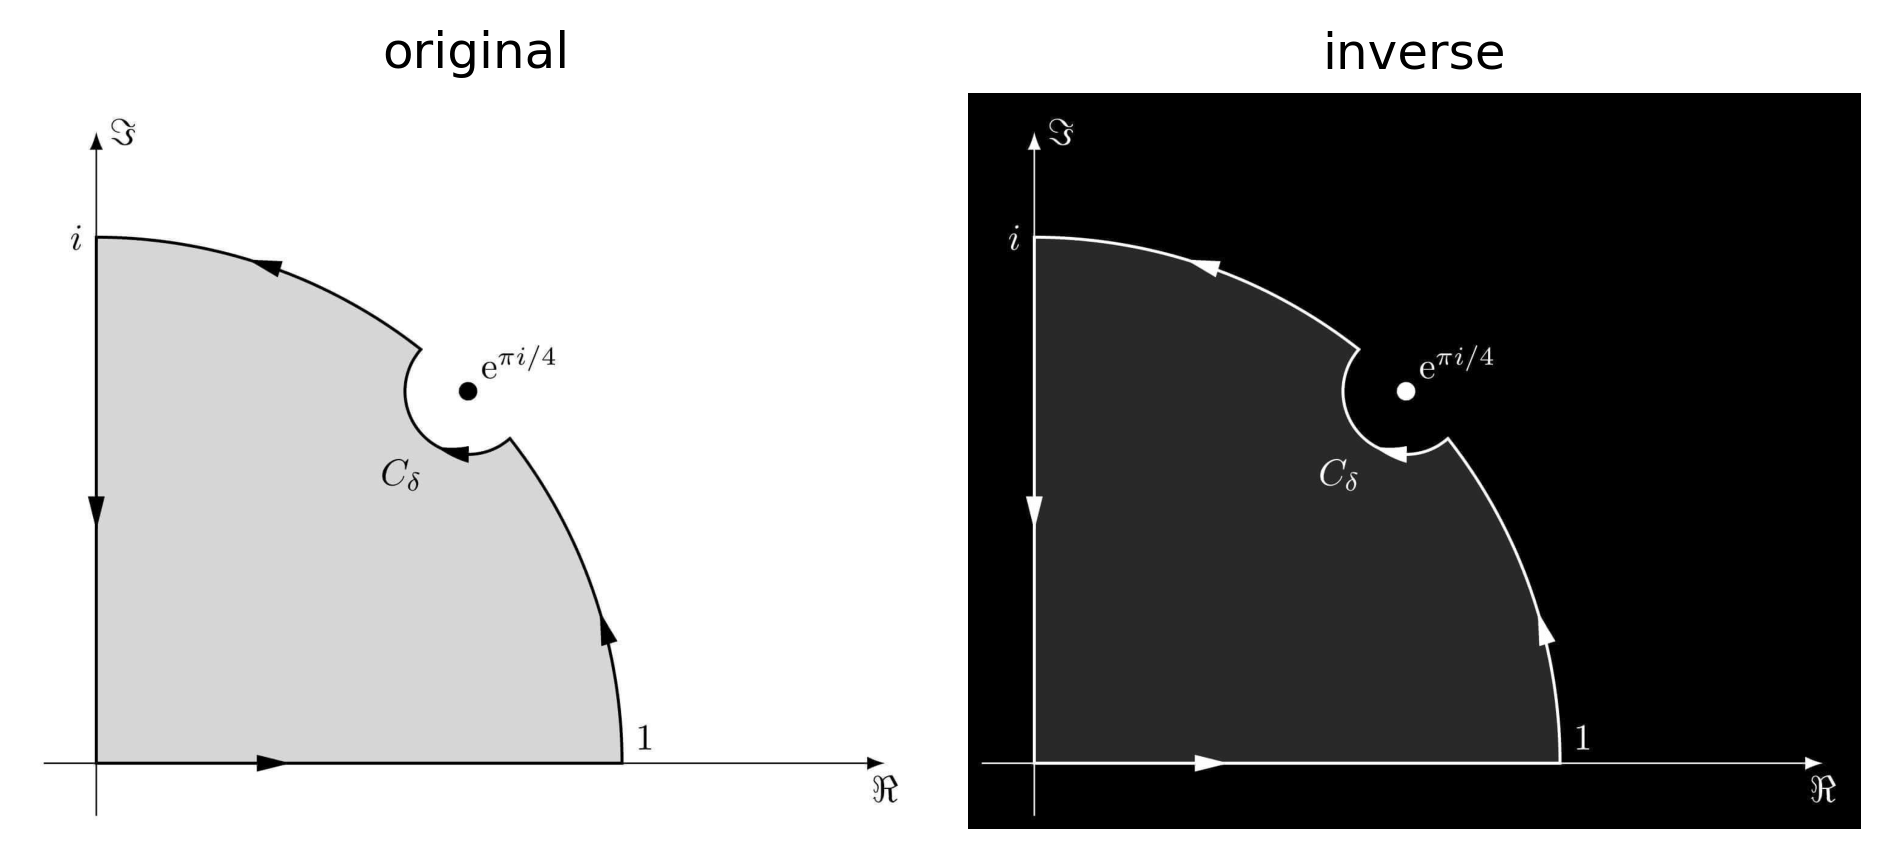
 反色图片与原图片对比
12. 其他问题
12.1. GitHub Commits 提交规范
Conventional Commits 是一种规范化的 Git 提交信息格式,能有效提升 commit message 的可读性,也方便历史记录和版本控制。
最基础的格式如下:
1
2
3
4
5
<type>[optional scope]: <description>

[optional body]

[optional footer(s)]
其中 <type> 表示提交类型(必填),也决定它在 changelog 中的分类,通常有以下几种:
- feat: 新功能;
- fix: 修复 bug;
- docs: 仅修改文档;
- style: 不影响代码逻辑的修改,比如格式、空格、缩进、缺失的分号;
- refactor: 代码重构(不包含功能变更或 bug 修复);
- perf: 性能优化;
- test: 添加测试或修改测试;
- build: 构建系统或依赖的变动(例如 webpack、rollup)
- chore: 杂项、不属于其他类型的更改(比如改 .gitignore、更新依赖);
- ci: 持续集成相关(GitHub Actions、Travis CI、Circle 等);
- revert: 回滚某个提交(会自动生成 footer)。
而 [optional scope] 表示影响范围(可选),[description] 表示简短的描述(必填),例如:
1
2
3
feat(blog): add comment system
fix(pdf): correct link to external document
docs(readme): update usage instructions
[optional body] 在解释提交的动机、问题背景、修改细节,尤其是重大提交或 refactor 时有用。[optional footer(s)] 则用于关闭 issue、BREAKING CHANGE 等信息。
12.2. git push 失败: couldn’t connet to server
将本地文件 push 到 github 远程仓库里,经常出现 couldn't connet to server 的报错,经过查询没有明显有效的办法。以下是可能有效的措施(目前来看第三种最有效):
- 关掉梯子 (VPN) 再 push 一下试试;
- 在命令行中运行以下代码来取消代理。
1
2
git config --global --unset http.proxy
git config --global --unset https.proxy
- 打开梯子的情况下。对右下角网络点击右键,打开
网络和 Internet 设置,点击代理,查看地址和端口号,如127.0.0.1:7890。在命令行中输入1
git config --global http.proxy http://127.0.0.1:7890可通过
git config --global -l查看是否设置成功。之后再进行 push 即可。
12.3. jekyll serve 预览速度较慢
方法很多,比如减少文件夹数量、压缩图片大小等。以下罗列一些我摸索出来的方法:
对博客设置增量构建(即只重新建构发生更改的文件,而不是每次重新构建整个站点),可以在
_config.yml中添加incremental: true,之后每次 jekyll 都将重新构建发生更改的文件。当然更合适的方法是使用
bundle exec jekyll s --incremental或者bundle exec jekyll s --I来构建博客,这样手动可调更灵活。压缩图片大小,这也是加速博客构建和浏览的一种方式。
12.4. 避免 Liquid 标签被解析
在 Jekyll 中,{{ ... }} 和 {% ... %} 是 Liquid 模板语言的语法。如果在 post 中不小心使用了它们(比如用了花括号),可能会被 Jekyll 当作模板语法解析,导致渲染出错。
有两种常用的解决办法。
- 禁用整篇文章的 Liquid 渲染。只需在文章的 Front Matter 中添加
1
2
3
---
render_with_liquid: false
---
- 用
{% raw %}包裹需要保留的 Liquid 代码段。一个例子如下所示:1 2 3 4 5
<!-- {% raw %} --> {% if user %} Hello, {{ user.name }}! {% endif %} <!-- {% endraw %} -->
与第一种方法相比,第二种方法更灵活,只影响局部代码块,其它部分仍可正常使用 Liquid 模板。
12.5. 在 blog 中插入文件
使用 <iframe> 元素即可,如
1
<iframe src="file path" width="100%" height='800'></iframe>
利用这个技巧可以在 post 中插入 .html, .pdf 等文件进行预览。
这个功能在谷歌浏览器上可以正常使用,但是其他浏览器不一定支持,且加 overflow 在移动端也不能产生滚动条,慎用!
12.6. 在 blog 中在线运行 Python
在 post 里加入以下代码,可以在线运行 Python (虽然感觉有点鸡肋,但还是记录在这里)
1
2
3
4
5
<iframe
  src="https://jupyterlite.github.io/demo/repl/index.html?kernel=python&toolbar=1"
  width="100%"
  height="500px">
</iframe>
12.7. 其他可能有用的资源
- TinyPNG, Website Planet:免费的在线图片压缩网站,虽然说是有损压缩,但视觉上几乎没有影响,且图片压缩甚至能达到 80%。
- PageSpeed Insights:谷歌推出的网站性能检测工具,输入网址后会提供一个报告和优化方案,顺带看看哪里拖慢了加载速度。
- Coolors, Color Hunt:在线调色网站,可以用来提供推荐配色。